
It happens to the best of us. You are standing in front of a breathtaking sunset, you whip out your iPhone, and click. It’s a masterpiece. Later, you plug your phone into your work PC or try to upload the file to a website, and you are greeted with a baffling error message.
The file isn't a friendly .jpg. It is a .HEIC. And your computer has no idea what to do with it.
This moment of frustration is usually when people discover the setting buried deep in their iPhone menus: High Efficiency vs. Most Compatible. This single toggle switch represents a massive technological divide between Apple's modern vision and the rest of the digital world.
If you have read our previous deep dive, What is a HEIC File? The Ultimate Guide, you know why Apple made the switch (spoiler: it saves massive amounts of space). But knowing the history doesn't answer the practical question you face every day: Which one should you actually use?
⚡ The 30-Second Verdict
Short on time? Here is the cheat sheet: Use HEIC if you want to save storage space and take better photos. Use JPG if you constantly transfer files to Windows PCs or use older websites. If you are stuck with HEIC files you can't open, use our free converter tool here.
Chapter 1: The Contenders Defined
To understand this battle, we need to look at the DNA of these two file formats. They aren't just different file extensions; they process reality in fundamentally different ways.
The Veteran: JPEG (Joint Photographic Experts Group)
Born in 1992, JPEG is the universal language of digital images. It was designed when hard drives were small and internet speeds were slow. It works by dividing an image into 8x8 pixel blocks and simplifying the data within those blocks. It is 'lossy,' meaning it throws away data to save space.
The Challenger: HEIC (High Efficiency Image Container)
Popularized by Apple in 2017 (iOS 11), HEIC is based on the HEVC video compression standard. Instead of simple blocks, it uses complex mathematics to track patterns across the entire image. It is smarter, younger, and much more efficient.
Chapter 2: The Storage Wars (File Size Analysis)
This is the main reason Apple forces HEIC on you by default. Modern iPhone cameras capture an insane amount of data—48 megapixels of resolution, Deep Fusion texture data, and Smart HDR lighting information.
If you saved all that data as a standard JPEG, your 128GB iPhone would be full in a few months. HEIC acts as a hyper-efficient zipper, shrinking that data down without breaking it.
Real-World File Size Test (iPhone 15 Pro)
| Scene Type | JPG Size | HEIC Size | Space Saved |
|---|---|---|---|
| Detailed Landscape | 5.2 MB | 2.4 MB | ✅ 54% |
| Portrait of Person | 3.8 MB | 1.9 MB | ✅ 50% |
| Low Light / Night | 2.5 MB | 1.1 MB | ✅ 56% |
| Complex Texture | 6.1 MB | 3.2 MB | ✅ 48% |
As you can see from our tests above, HEIC consistently cuts file size in half. This isn't magic; it's better math. If you have a 10,000-photo library, choosing HEIC saves you roughly 25GB to 30GB of storage space. That is room for roughly 500 extra apps or 5 feature-length movies downloaded for a flight.
🏆 Winner: HEIC
It's not even close. If storage anxiety keeps you up at night, HEIC is your best friend.
Chapter 3: Image Quality & The 'Banding' Issue
A common myth in the tech world is "Compression equals bad quality." While that was true in the 90s, HEIC flips the script. It is smaller than JPG, yet it looks better.
How is that possible? It comes down to Bit Depth.
The Science of Color:
JPG is 8-bit: It can display roughly 16 million colors.
HEIC is 10-bit: It can display over 1 BILLION colors.
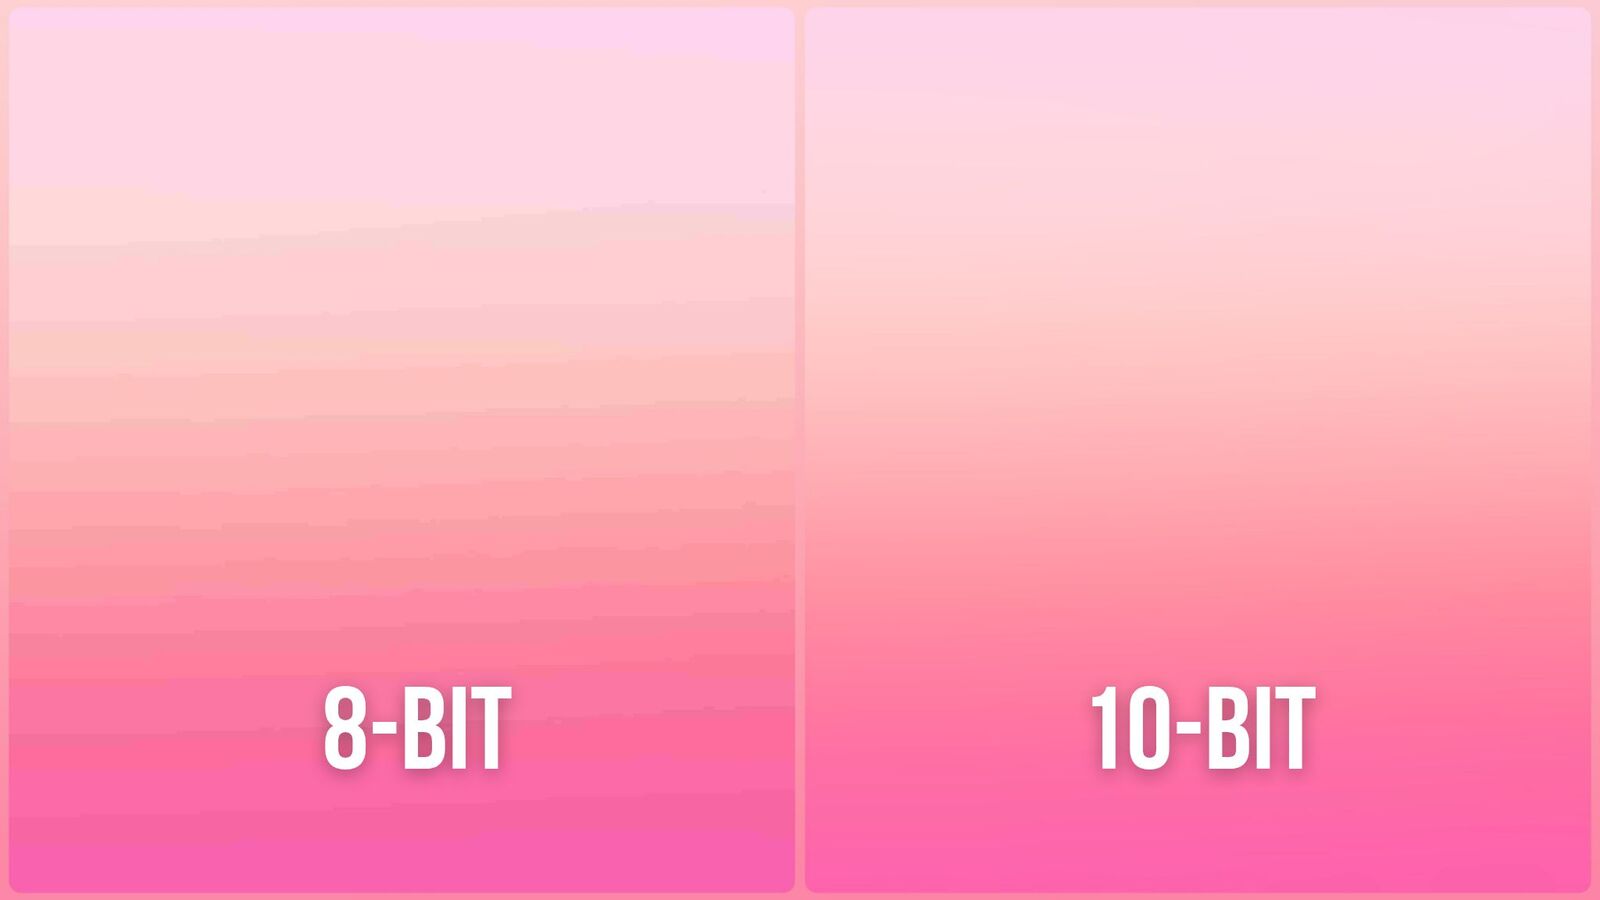
The Result: 8-bit images often struggle with smooth gradients, like a blue sky fading into a sunset. You see ugly "bands" or stripes where the color jumps from one shade to another.
The Solution: HEIC has enough data to make that transition perfectly smooth.
Furthermore, HEIC supports non-destructive editing. When you crop or rotate a HEIC file on your iPhone, the phone doesn't delete the pixels; it just changes the instructions on how to display them. This means you can often "undo" edits later without losing quality.
Chapter 4: The Compatibility Nightmare (Windows & Web)
If HEIC is so amazing, why doesn't everyone use it? Why are we even having this debate?
Because outside of the Apple ecosystem, HEIC can be a pain.
Apple lives in a 'Walled Garden.' Inside that garden (Macs, iPhones, iPads), HEIC flows like water. But the moment you throw a HEIC file over the wall—to a Windows PC, a Linux server, or an old Android phone—it hits the ground with a thud.
The Windows 11 Problem
Even modern versions of Windows do not always support HEIC out of the box due to licensing fees. You might double-click a photo only to be told you need to buy a $0.99 extension from the Microsoft Store. If you are facing this specific issue, we wrote a dedicated guide to fixing it: How to Open HEIC Files on Windows: The Troubleshooting Guide.
The Web Problem
Web browsers are another hurdle. Chrome, Firefox, and Edge are slowly adding support, but most websites (WordPress, government portals, school submission forms) will flat-out reject a .heic upload. They expect JPG or PNG.
🏆 Winner: JPG
JPG is the cockroach of file formats—it survives everywhere. Until the rest of the world catches up to Apple, JPG remains the king of compatibility.
Chapter 5: Secret Superpowers (Live Photos & Depth)
Here is where the 'Container' part of 'High Efficiency Image Container' matters. A JPEG is a flat image. It is 2D. It is static.
HEIC is a 3D container that can hold multiple layers of data. This allows your iPhone to do magic tricks:
HEIC-Exclusive Features:
Portrait Mode editing: Because HEIC stores a 'depth map' (a 3D scan of the scene), you can take a photo and adjust the background blur (bokeh) months later.
Live Photos: HEIC bundles the 3-second video clip and the high-res still image into one neat package. JPG splits them into two messy files.
Bursts: HEIC can store multiple shots in one file wrapper, keeping your file system clean.
If you switch your camera to 'Most Compatible' (JPG), you lose the ability to edit Portrait mode depth after the shot is taken. The blur gets 'baked in' permanently.
The Final Decision: Which Setting Do You Need?
You now have all the data. It's time to make a choice. Here are the profiles we recommend based on user habits.
Profile A: The "Apple Purist" (Stick with HEIC)
If you own a Mac, an iPad, and an iPhone, and you pay for iCloud storage, you should absolutely leave your setting on High Efficiency. You get better quality, smaller files, and the ecosystem handles the compatibility for you invisibly.
Profile B: The "Cross-Platform" User (Switch to JPG)
If you manually drag-and-drop photos to a Windows PC via USB cable, or if you are a web developer who needs to upload assets to a CMS constantly, switch to Most Compatible. The storage penalty is worth the time you save not converting files.
Profile C: The "Hoarder" (Stick with HEIC)
If you have a 64GB phone and never delete anything, do NOT switch to JPG. Your phone will fill up twice as fast, and you will be forced to delete memories.
How to Change Your iPhone Camera Settings
Ready to switch? Here is exactly where the toggle is hiding.
Step-by-Step Instructions:
Open the Settings app on your iPhone.
Scroll down and tap Camera.
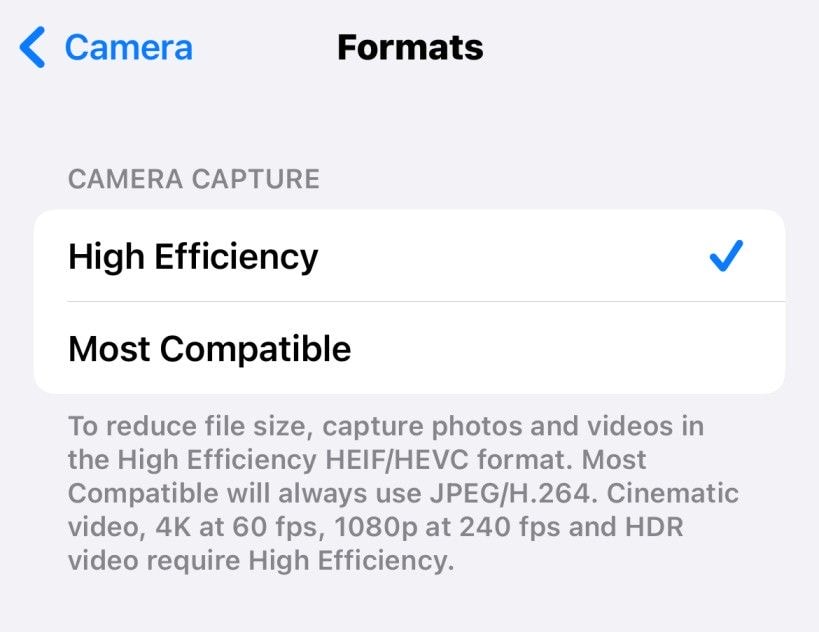
Tap the very first option: Formats.
Choose High Efficiency (for HEIC) or Most Compatible (for JPG).
Pro Tip: The Hybrid Workflow (Best of Both Worlds)
There is a secret setting that lets you have your cake and eat it too. You can keep shooting in HEIC to save space on your phone, but tell iOS to automatically convert files to JPG only when you transfer them to a computer.
Go to Settings > Photos, scroll to the very bottom, and under 'Transfer to Mac or PC', select Automatic.
Now, your phone stays efficient, but your PC sees compatible JPGs. It's magic.
Dealing with the Aftermath: Converting Old Files
If you decide to switch to JPG today, that's great for your future photos. But what about the 5,000 photos you took over the last three years? They are still stuck as HEIC files.
You don't need to delete them. You just need a privacy-focused converter.
At FastHEIC, we built a tool specifically for this transition. Unlike other sites that upload your photos to a cloud server (creepy!), our tool converts files directly in your browser using your own computer's power. It's faster, safer, and completely free.
🚀 Start Converting
Ready to fix your library? Click here to use the FastHEIC Converter now.
Don't install sketchy software.
FastHEIC converts your files 100% in your browser. No uploads, no privacy risks, no cost.
Convert HEIC Images NowFree • Secure • Unlimited